A company file in QuickBooks is an important file that saves all your business’s financial information. QuickBooks allows users to save different company files for their multiple businesses. However, if you don’t want to use an existing company file and if you want to delete it, then you are at the right place. This blog post will provide complete information about how to delete a company in QuickBooks. So, read this blog till the end.
How to Delete a Company in QuickBooks Windows?
If you are using a windows PC, below are the steps you can carry out to locate the company’s file in the QuickBooks desktop application.
1. Locating the Company’s File
- First, launch the QuickBooks desktop application and click on the “File” option.
- Afterwards, you must select the “Open a Company File” option under the drop-down list and click on the “Next” option.
- Select the file you want to delete and click on the “Open” option.
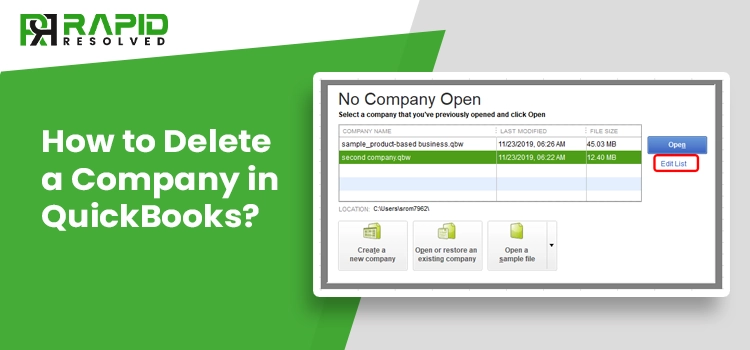
- Thereon, navigate to the location where the company’s file is saved, which you can do by pressing the F2 key, i.e. C:\ Documents and Settings\ All Users\ Documents\ Intuit\ QuickBooks\ Company Files\ Name of the file.
- At last, close the QuickBooks desktop application and click on the “File” and “Exit” options.
Also Read – How To Delete Deposit in QuickBooks?
2. Deleting a Company’s File
After you have located the company’s file, the next step is to delete the file. To do that, here are the steps that you can carry out to do the same.
- Firstly, navigate to the location where the QuickBooks company’s file is saved.
- After that, right-click on the company’s file name and click on the “Delete” option.
- Once you have deleted the company’s file, launch the QuickBooks accounting software and click on the “Edit List” option.
- Now, search there for the hide box and then click on it. You may find this removed file in the data file.
Note: The last step in the procedure is quite important and will help you delete the company’s files that you don’t need any more. Apart from this, the company file will get hidden, and you will be able to see this company file in the “No Company Open” window.
How to Delete a Company’s File in QuickBooks Desktop Mac?
Let’s look at the steps you can execute to delete a company’s file in QuickBooks desktop Mac.
1. Locating the Company’s Files
Below are the steps you can carry out to locate the company’s file of QuickBooks on a Mac laptop.
- Firstly, double-click on the company’s file which you want to delete.
- Click on the top menu bar and select the “Help” option.
- Moving ahead, you have to click on the “Product Information” option.
- Now, a new page will open on your screen.
- Here, you have to see the location of the company’s file.
- Thereon, navigate to this location on your Mac device. The default path of the QuickBooks company’s file on Mac is Documents\ Intuit\ QuickBooks\ Company Files\ File Name.
- At last, close the current window on your PC.
2. Deleting the Company’s Files
Here are the steps you can follow to delete a QuickBooks company’s files on a Mac device.
- Firstly, navigate to the location where the QuickBooks company’s files are saved on your device.
- Thereon, click on the file you want to delete and then drag the file to the trash bin.
- After that, you must remove the file with a disc image after deleting the file. These files will terminate their file names with “.dmg.” Copies of the QuickBooks company’s file will be created by QuickBooks every time you access your account.
- However, this feature will only work if you have enabled the auto-backup option.
How to Delete a Company in QuickBooks Online?
Let’s look at the steps you can follow to delete a company in QuickBooks online.
[Note: Once you have permanently deleted or replaced the QuickBooks online company’s file, you will not be able to restore it.]
1 Deleting a Company File in QuickBooks Online
- First, navigate to your QuickBooks online account, and then click on the “Gear” icon at the top right side of the screen.
- Thereon, click on the “Accounts and Settings” option and then you have to select the “Billing and Subscription” option.
- After that, you can see your subscription status and then click on the “Cancel” option alongside the subscription status.
- A prompt window will appear on the screen, asking you to select whether you want to delete or change the plan.
- Therefore, if you want to delete the file, click on the “Cancel” option.
2 If your Account’s Activation is Older than 60 Days
If it’s more than 60 days, you cannot purge your company data; then, you have to cancel and buy a new subscription in that scenario. To do that, here are the steps that you can follow to do so.
2.1). Cancelling Account Subscription
- First of all, you have to log in to your QuickBooks online account.
- You must click the “Gear” icon and browse your account settings.
- After that, you have to click on the “Update Credit Card” option.
- Moving ahead, navigate to the Subscription status section and click on the “Cancel Subscription Link” option.
- At last, keep following the on-screen instructions to complete the cancellation process.
2.2). Create a New Account
- First, open a compatible web browser on your device, type http://quickbooks.intuit.com/signup/ in the insert field, and then press the enter button.
- Thereon, you can use your same old user ID and login password to access the account, or else you can provide information to create a new account.
3. If your Account’s Activation is not Older than 60 Days
You must import the QuickBooks desktop company file if your account’s activation is not older than 60 days. Here are the steps that you can follow to delete a company’s file in QuickBooks online:
- Firstly, navigate to your QuickBooks online account.
- Thereon, you have to click on the “Gear” icon available at the upper right side of the screen.
- After that, click on the “Import Desktop Data” option and select your appropriate version.
- At last, keep following the on-screen instructions to complete the process.
4. Purging The Data (If Your Accounts Activation is Less Than 60 Days)
- Firstly, you have to log in to your QuickBooks online company account.
- Now, you will be able to see the URL. Here, you have to ask the experts to change the URL.
- After that, a new window will open on your screen. Here, you will be able to see the summary of entire items that you need to be deleted.
- Thereon, click on the “Yes” option to confirm your actions.
- Now, click on the “OK” option.
- If the preferred industry is different from the one you are viewing, you can change it easily. Here, you can easily select if you want to start the account based on industry or with the empty Chart of Accounts (COA).
- At last, once you are done with the selection, click on the “Wipe Data” option.
After performing the steps mentioned above, you will be redirected to the home page. Now, you can easily create a new file or can exit the current window.
Ending Note
We hope you find this blog well. In this blog post, we have provided all the necessary and relevant information about how you can delete a company on QuickBooks desktop and online. In case you still have any query related to QuickBooks company’s file, then you speak with our live executives to get the best answer for your query. Our experts are available 24*7 at the help desk to answer your query.