Sometimes, when a user tries to update the QuickBooks desktop application to the latest release, an error message stating “QuickBooks subscription has lapsed” appears on the screen. Once this error message appears on the screen, the users will not be able to install the new updates or use the QuickBooks desktop application. This issue can become a headache if the user needs to learn how to deal with it. No worries, we are here to help you with that. In this post, we will cover some solutions you can perform to eliminate the error.
What is QuickBooks Subscription Has Lapsed Issue?
Whenever a user wants to download the new update in their QuickBooks desktop application, the server first verifies the validation of their subscription. Any reason if QuickBooks fails to verify the subscription, then it leads to the QuickBooks subscription lapsed issue.
This error arises with a pop-up display message as:
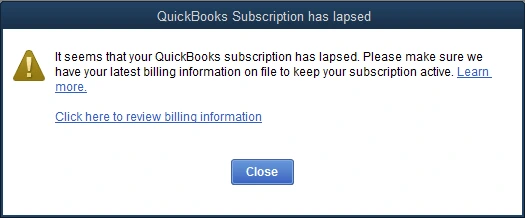
“Oh No! It seems that your QuickBooks subscription has lapsed due to some reason.”
Possible Reasons Behind QuickBooks Subscription Has Lapsed Issue
Before you directly jump on to the solutions to get the issue resolved, it’s important to understand the possible reasons due to why the error arises. Understanding the possible reasons can reduce the chances of facing the error again.
So, here is the list of the possible reasons due to why the QuickBooks subscription has lapsed issue arises;
• A weak or unstable internet connection.
• Intuit has discontinued the QuickBooks desktop version which you are using.
• An outdated version of the QuickBooks desktop application can also be a reason for the issue.
• QuickBooks fails to renew your subscription due to outdated credit card or net banking information.
• Installation issues in QuickBooks can also lead to some glitches while verifying the QuickBooks subscription.
• An outdated or misconfigured internet browser can also be a possible reasons leading to QuickBooks has lapsed issue.
• QuickBooks ECML file, which includes product and licensing information, is damaged or corrupted.
Solutions to Resolve QuickBooks Subscription Has Lapsed Issue
Let’s discuss some of the tried and tested solutions that you can easily follow step-by-step to eliminate the QuickBooks subscription lapsed issue;
Solution 1. Restoring QuickBooks ECML File
QuickBooks ECML file includes the product and licensing information of your QuickBooks account. In case the ECML file of your QuickBooks account is missing from your device, then it can lead QuickBooks subscription has lapsed issue.
Given below are the steps that you can perform to restore the QuickBooks ECML file on your device;
• First, you must search for the product and licensing information of your QuickBooks subscription account.
• Thereon, exit the QuickBooks desktop application.
• After pressing, you have to open the windows run command on your device by pressing the “Windows + R” keys together.
• In the search field, you must type “C:\ ProgramData\ Intuit\ Entitlement Client\ v8” and then press the enter button.
• If this file does not open, try opening the “C:\ ProgramData\ Intuit\ Entitlement Client\ v6.”
• Once the folder opens, you have to search for the EntitlementDataStore.ecml file.
• Now, do a right click on the file name and then select the “Delete” option. You must select the “Yes” option to confirm the deletion request.
• Once you are done with the above steps, launch the QuickBooks desktop application and your company file.
• After that, you must follow the instructions to re-register your QuickBooks account with your licensing and product information.
By executing the steps mentioned above, you have successfully restored your QuickBooks account’s product and licensing file. Now, try downloading the new updates of your QuickBooks desktop application and check whether the QuickBooks subscription lapsed issue has been eliminated.
Solution 2. Update the Billing Details in QuickBooks Desktop Application
If you have recently changed the bank accounts or credit card links to your business, then you have to update these payment details for the QuickBooks subscription.
Given below are the steps that you can follow to update the billing details in your QuickBooks desktop application;
• First, you must sign in to the customer account management portal as the admin user.
• Under the “Products and Services” section, you must select the QuickBooks desktop product.
• Now, navigate to the “Billing Information” section and click on the “Edit” option.
• After that, you have to update the payment details, and once you are done with that, click on the “Save and Close” option to save the new changes.
• Now, re-launch the QuickBooks desktop application, click on the “Help” menu option, and select the “Manage My License” option.
• Followed by the above steps, click on the “Sync License Data Online” option.
Solution 3. Download New Updates of QuickBooks Desktop
Using an outdated version of the QuickBooks desktop application is one of the most common reasons that lead to various glitches while using the software. Updating the QuickBooks Desktop application to the latest release can help you to revoke various errors.
Here are the steps that you can follow to update the QuickBooks desktop application;
• Firstly, launch the QuickBooks desktop application and then click on the “Help” menu option available at the top upper side of the screen.
• After that, a drop-down list will open on your screen. Here, you have to select the “Update QuickBooks Desktop” option, and then the QuickBooks update window will appear on your screen.
• Thereon, you have to click on the “Update Now” option, and here, you must check-mark all the options, i.e., Essentials, New Features, Maintenance Releases, Help, and Accountant.
• Now, click on the “Get Updates” option, which is available in the blue box.
• After that, the downloading process will commence on your screen.
• Restart the QuickBooks desktop application as the updates get downloaded on your device.
• As you launch QuickBooks, a new update service pop-up window will appear on your screen.
• Here, you have to click on the “Install Now” option.
After updating the QuickBooks desktop application, try to access the QuickBooks company’s file and verify whether the QuickBooks subscription lapsed issues have been eliminated.
Solution 4. Run QuickBooks Install Diagnostic Tool
Another solution you can follow to resolve the QuickBooks subscription lapsed issue is running the QuickBooks install diagnostic tool on your device.
Let’s discuss the steps that you can follow to run QuickBooks install diagnostic tool on your PC;
Step 1. Install QuickBooks Tool Hub
QuickBooks Install Diagnostic Tool is an in-built tool of QuickBooks tool hub, and if you want to access that tool, you first have to install the QuickBooks tool hub on your device.
Here are the steps that you can follow to install the QuickBooks tool hub on your device;
• Firstly, you must download the latest version of QuickBooks Tool Hub on your device, i.e., 1.5.0.0.
• Once you have downloaded the file, then double-click on the downloaded file to open it.
• Thereon, keep following the on-screen instructions to install the tool on your device.
• After installing the tool, double-click the application icon to launch it.
Step 2. Use QuickBooks Install Diagnostic Tool
After you have launched the QuickBooks install the diagnostic tool on your device, then given below are the steps that you can follow to run QuickBooks Install Diagnostic tool;
• First, click on the “Installation Issues” option, which is available on the left side of the screen.
• You must click on the “QuickBooks Install Diagnostic Tool” option.
• Now, the diagnostic tool will start fixing small errors and bugs.
• After that, as the repair process ends, then click on the “OK” option.
By performing the steps mentioned above, you have completed the repairing process of QuickBooks files on your device. Thereon, verify whether the QuickBooks subscription lapsed issue has been eliminated. After following the above-mentioned steps, the QuickBooks subscription lapsed issue will must be eliminated at this stage.
To Summarize
As demonstrated above, we have covered four tried and tested solutions you can easily carry out to resolve the QuickBooks subscription lapsed issue. If you are still facing the error or have any other query related to the topic, then you can connect with our professional QuickBooks experts. Our experts are available 24*7 to provide you with the best answer to your query. You can easily connect with our team via the chat box or write us your query via mail at info@rapidresolved.com.