QuickBooks is an accounting and financing software that is used by almost every person living in America. This software was developed in two versions, Desktop and Online. However, a QuickBooks user can go ahead and work on any of these at their convenience. But if you want to use this software from anywhere, then move your QuickBooks Desktop file to QuickBooks Online might be the best option.
If you also want to know how you can make the transfer, you are at the right place. This blog will provide you with a step-by-step guide for the same. By following these steps, you won’t even lose existing data from your QuickBooks.
Move Your QuickBooks Desktop file to QuickBooks Online.
Here is an ABC for you to follow.
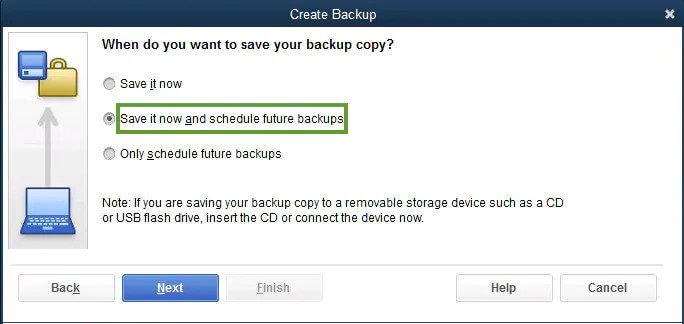
Step 1: Make a backup of your files.
If you are an existing QuickBooks user, then you would not want to lose your existing data at the time of transfer.
• The first step here must be to switch to a single-user mode.
• Open QuickBooks Desktop and locate the File menu.
• Here, from the list of available options, click on Switch to single-user mode.
• Once that is done, go to Backup Company from the same list under the File menu.
• From the sub-list, choose to Create Local Backup.
• Next, choose local backup and hit Next.
• Moving forward, you will need to enter where you want to save your backup file on the Backup Options tab.
• Also, choose how many backup files you require.
• The software will run a quick test to check if your Desktop is good to go, and then you can click OK.
• Finally, save the file.
Read More – How to Backup QuickBooks Desktop Company File
Step 2: Check the target count
Checking the target count is important before you make the transfer. Target is basically every transaction that you make. The software can only carry forward 3,50,000 or fewer targets. To check the number of current targets, press Ctrl + 1.
The product information window will open up in front of you. Here, you will find the Total Targets on the left side of the page. Now, if you have more than 3,50,000 targets, then you can simply condense the number. This can be done by removing all the closed targets.
If the targets are still not under the limit, then QuickBooks will make a partial conversion from Desktop to Online.
Step 3: Save your Tax Liability Report
Since the tax liability report is not transferred at the time of the switch, it is important that you save it before you do the migration. So, if you do not want to work on all the entries again, then make sure you save the file beforehand. With the save file, all you will have to do is adjust some entries.
Step 4: Export files to QuickBooks Online
Now, it is time to migrate your QuickBooks Desktop file to QuickBooks Online.
• To initiate the transfer, go to the Company option from the Menu bar of QuickBooks Desktop.
• From the drop-down list, click on the Export your company file to QuickBooks Online.
• Next, select Get Started button and done.
If you do not see the option, you will have to update your QuickBooks Desktop.
• Go to the Help option available on the Menu bar again.
• From the list, click on Update QuickBooks.
• A new window, ‘Update now,’ will pop up on your screen.
• Here, select all the update options and click on Get Updates.
• Once done, click on Exit.
• Now, you can open the QuickBooks Desktop again, and you will find the option.
Step 5: Sign in on QuickBooks Online
• Go to your browser and head to QuickBooks Online.
• Here, you enter your credentials and checkmark the Terms and Conditions.
• Now, click on Sign-In.
• Note that if you are using QuickBooks Desktop 2016 or any version, then your next step would be to click when asked permission to transfer inventory. Hit Continue then.
• Next, enter some basic details about your company, including its name, type of business, and more. Put in these details and click on Next.
• On the following page, you need to put in your email address where QuickBooks will send you a confirmation mail.
• Finally, click on OK, got it! Button.
Step 6: Transfer Data File
After you have put in your company details, on the next page, QuickBooks will display a confirmation message. Now, this confirmation process might be time taking. This can even take a couple of hours. But once it’s done, you will receive an email about the same.
Click on the Complete your setup option then.
Step 7: Export Lists to Excel
Exporting Lists to Excel will save you from doing data entry for hours once you move to QuickBooks Online.
Chart of Accounts Transfer
• Go to the Company menu and click on the Chart of Accounts from the drop-down list.
• Now, from the bottom of this window, select Reports and then Account Listing.
• From the Account Listing tab, click on Excel and select Create New Worksheet.
• The software will now make the transfer for you. Make sure to save the file where to want it to be.
Customers List Export
• From the menu bar of your QuickBooks Desktop, head to Customers.
• Next, click on Customers Center. You can also just press Ctrl + J to access this window.
• Under this window, you will locate the Excel option.
• Now, choose Export Customer List, and you are good to go.
Vendors List Transfer
• Again, go to the menu bar on your QuickBooks desktop and click on Vendors.
• Go to the Vendors Center and look for the Excel tab.
• Finally, click on the Export Vendors list and save the file.
Products and Services Export
• Locate the Customers tab in QuickBooks Desktop.
• Here, look for the Item List and click that.
• Now, hit the Excel option available at the bottom of this window.
• To export and save the file, select Export All Items.
Step 8: Import Lists to QuickBooks Online
Once all the data is exported from QuickBooks Desktop, all you need to do is import it to QuickBooks Online. Instead of taking you through the entire process of importing each item under the list, let us put it this way:
Once you have signed into QuickBooks Online, you will find a similar Menu Bar. Go to each item and open their windows. Now the difference is, instead of clicking the Export option, you now need to hit the Import from Excel button.
Repeat this with each item that you have exported, and you are good to go.
Conclusion
Although using QuickBooks Desktop and QuickBooks is mostly similar, with the Online version, you can make use of it on the go. This blog has provided you with a step-by-step guide that you can follow to move your QuickBooks Desktop file to QuickBooks Online with minimal effort.
In case you get stuck at any step or need more advice or assistance, you can get in touch with our team of experts, and they will help you through it.
FAQs (Frequently Asked Questions)
Does all my data from QuickBooks Desktop get transferred to QuickBooks Online when making a transfer?
No, there are a few things that QuickBooks does not transfer to its Online version. Here is a list of the same:
• Credit card changes
• Reconciliation history
• Audit trail
• Existing reports
• Inventory (if using Mac)
Can I use QuickBooks Online and QuickBooks Desktop together?
Yes, if you want, you can operate your QuickBooks application online as well as on the Desktop simultaneously.
How can I import my Customers List to QuickBooks Online?
If you have wanted to get your list of customers on QuickBooks Online, then the easier way would be to export the file into excel. Once that is done, and you have the excel file with you, follow the steps mentioned below to import it:
• Open QuickBooks online and head to the menu bar.
• There, click on Customers and then select Customer Center. The shortcut to that is Ctrl + J.
• On the Customer Center window, go to Excel and select Import from Excel.
• You will have your customers list in your QuickBooks Online.
How much time do I need to transfer QuickBooks Desktop to QuickBooks Online?
There is no fixed time that the transfer my take. It can take anything from a couple of hours to a whole day. This usually depends on the following factor:
• File size
• internet speed
• Desktop speed
Can I go back to QuickBooks Desktop once I transfer it to QuickBooks Online?
Yes, you can switch back to QuickBooks Desktop after the transfer. However, it will again require the entire process of importing and exporting files.