QuickBooks Error Code H202 is a perplexing error code that often occurs when running QuickBooks in multi-user mode. QuickBooks is definitely one of the most trusted accounting solutions; however, errors are in inevitable part of the QuickBooks experience. Let’s start discussing this common error of QuickBooks and how it can be resolved effectively to avoid any disturbance in operation.
QuickBooks Error Code H202 and the Reason Behind it
If you are a QuickBooks user, then you may encounter QuickBooks Error Code H202 when you are trying to open their company file in a multi-user mode. This error will act as an obstacle whenever you try to carry out any task on QuickBooks. In this post, we are going to share everything about QuickBooks H202 Error that you must surely know in order to find the right solution to your issue. With the help of Experts, we have prepared a step-by-step guide to resolve all your issues in real-time so that you can rest assured.
Even after following these steps, if you fail to resolve this issue, then we recommend you to get in touch with QuickBooks customer Support Team so that they can efficiently resolve all your issues and concerns in real-time. So, what are you waiting for? Contact QuickBooks Enterprise Support Now to troubleshoot h202 error QuickBooks now!
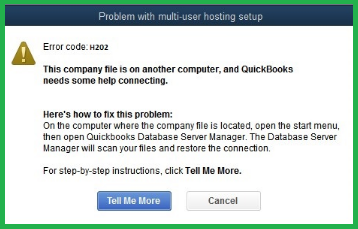
The images enlisted below are what you will get to see on your computer screen while facing this error.
Reasons behind QuickBooks Error Code H202
Check out the possible reasons behind the error code h202 quickbooks so that you can easily identify this error whenever you face any such situation.
- Most of the time, this error is caused when the hosting configuration setting is not done correctly.
- If the QuickBooks file setting is blocked for incoming and outgoing communication, then also you may face such errors.
- If something is wrong or damaged in the QuickBooks.ND file configuration. It blocks you from accessing the database file available on QuickBooks.
- Failing to find the main IP Address or making use of any other IP Address.
- The company data file fails to communicate with the server.
- DNS setting is inappropriate or incorrect.
- Failing to start services of QuickBooks like QuickBooksDBXX/QBCF.
- Security software or firewall is disabling the communication to the company file.
- Whenever QuickBooks users try to function with a company file that is placed in multi-user mode, then also the user faces h202 quickbooks error.
Easy Solutions to Fix QuickBooks Error H202
There are a number of solutions that you can try to troubleshoot QuickBooks Error H202. So, we are enlisting all of them for you to check which one works for you effectively.
Solution 1: Download and Run QuickBooks File Doctor tool
To download the QuickBooks File Doctor tool, click on this link: http://dlm2.download.intuit.com/akdlm/SBD/QuickBooks/QBPDF/qbfd.exe
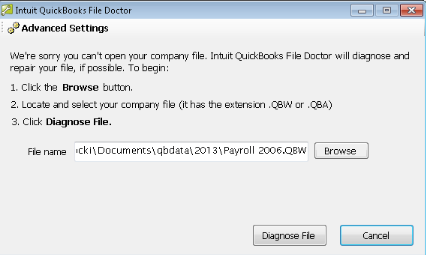
By following this link, first, you need to download the QuickBooks file doctor on your server so that you can easily and successfully resolve the QuickBooks error H202 while using the Multi-User mode. Just downloading this file on your server will resolve this QuickBooks error. And in case if you still face the same error, we will recommend you to go through another solution to try out!
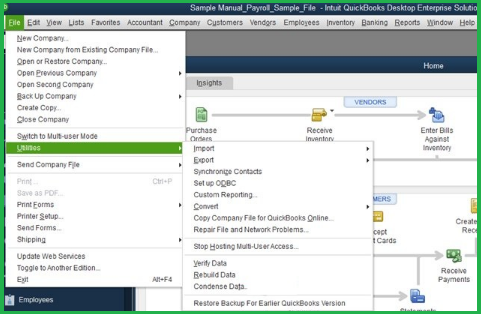
Solution 2: Verification of QuickBooks Hosting
- The very first step starts with starting QuickBooks on the hosting system and then clicking on the File option and then on Utilities.
 After this, you can find a complete list of Host Multi-User to access which your PC is not hosting. Proceed with the NEXT system. And also, rest assured that a minor change like this will never impact anything on your Desktop.
 In the next step, if you are able to find the Stop Hosting Multi-User Access option, then click on that.
 After this, you can find a complete list of Host Multi-User to access which your PC is not hosting. Proceed with the NEXT system. And also, rest assured that a minor change like this will never impact anything on your Desktop.
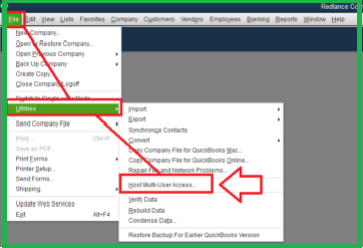 In the next step, if you are able to find the Stop Hosting Multi-User Access option, then click on that.
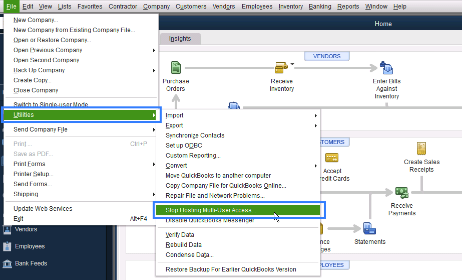
- While carrying out this process, make sure that your company file isn’t open. Now, click on Yes.
Solution 3: Verification of QuickBooks Services
- This solution to resolve the error is initiated by starting QuickBooksDBXX & QBCFMonitor.
- Go to the Windows “Start” button.
- Press the keys “Windows + R” keys together to run the program.
- In that running dialog box, Input “MSC” and press the “Enter” key.
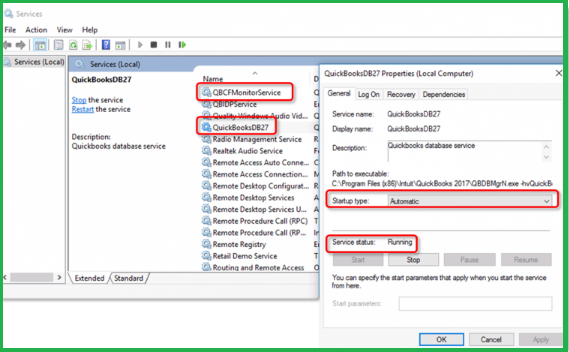
- Scroll down in the service window to find the QuickBooks DBXX service.
- If you fail to find QuickBooksDBXX service then follow this.
Using Database Server Manager, you have to confirm it to complete installation on a server.
Now “Run” your full program on a server. Before anything, you have to start QuickBooks and select and then check if the hosting is enabled or not.
- Double-click on the “QuickBooksDBXX” service option. Now, Confirm what the Startup type is then the service status starts.
 Click on the Recovery option available there.
- Start your device and go to the window menu available in the corner of your screen to restart the device. This will ultimately result in a restart of QuickBooksDBXX. If this doesn’t happen then repeat the same.
- Click on Apply to save all the changes.
- Repeat the above enlisted for QBCFMonitor.
- now, repeat all the steps again in QuickBooks Desktop for all your desktops.
 Click on the Recovery option available there.
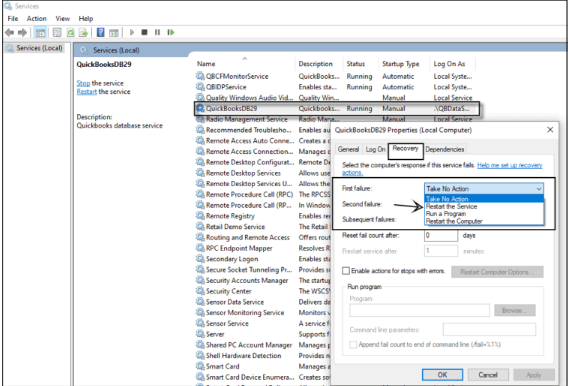
Solution 4: Ping your server from Your Desktop
The Reason behind the QuickBooks Error H202 can be the firewall issue. To resolve this issue, we advise the users to ping their server from different desktops that are encountering such issues enlisted; below are the steps for you to ping your server from different workstations successfully.
- Go to the Windows Start Menu on your Desktop.
- Input network type in the search bar and then open Network and Sharing Center.
- Click on Change advanced sharing settings.
- Make sure that you have turned on the Network Discovery.
Now follow the listed below steps to find your server name:
- Go to the Windows Start menu on your device.
- Now, input “CMD” in Run Window and then press enter.
- Input “ipconfig/all” into the Command window and then hit the Enter key on your keyboard.
- Now, go to the Windows IP Configuration and Search Host Name.
- Now, you will have to keep a note of your hostname and copy the same in a word file so that you can access it easily.
Solution 5: Download and Install QuickBooks Tools Hub and run QuickBooks database server manager
- First, download QuickBooks Tools Hub.
- Press Ctrl + J keys to get directed to the Browser download list.
- Click on QuickBooksToolHub.exe.
- Proceed further with its installation.
- Once the installation process is complete, Open the tool from the desktop icon.
- Now, run the database server manager.
- Double click on the QuickBooks tools hub option.
- Click on the Network Issue option.
- If you can view the company file in the right location, you need to proceed by clicking on the Start Scan option available there. Click on the browse option choose the company file folder.
- QuickBooks database server manager will repair the firewall and offers all required permissions.
- Now, open QuickBooks Desktop on which you are encountering the error code H202.
- Click on file> switch to multi-user mode.
Winding Up!
We will wrap up this post with our final words on QuickBooks error code H202 and how to resolve it. We hope that this post helped you to get rid of these issues by troubleshooting them professionally. Unfortunately, if you fail to resolve this error, then you are advised to get in touch with QuickBooks Customer Team via their toll-free helpline number, or you can also connect with the Expert via Live Chat.
FAQs (Frequently Asked Questions)
1. How do I identify the QuickBooks Error H202?
A: If your system is facing the below-mentioned symptoms, then definitely the QuickBooks is facing the error H202.
- Not able to use the multiple-user mode.
- Not able to open a company’s file located on another computer.
- A pop-up message occurs that displays QuickBooks error code H202.
- QuickBooks freezes or hangs at multiple frequencies.
- Your PC’s window is getting slow.
2. How do I solve the error through the windows control panel?
A: Here are the steps that you can follow to solve the error with the help of the windows control panel.
- First, close the QuickBooks.
- Then, go to the Windows Control Panel.
- Now select the “Programs & Features” option.
- Move ahead by selecting the “Change and repair” option.
- Allow all the asked requests, and then the repair process will start.
- Once the repair process is completed, then update the QuickBooks to the latest version.
3. I’m running a small company with 10 employees. Does using QuickBooks at this stage efficient for me?
A: Yes, QuickBooks services are available to use by each company whether it is an MNC or a small company. Although, initially, you will not be able to access all of their get all the features, but in the long term, as soon as your company will grow and more employees will join your company. Then definitely QuickBooks is going to be very important for you to manage all of your daily operations easily and smoothly.
4. Does this error can be solved by using the QuickBooks Diagnostic Tool?
A: Yes, the QuickBooks error H202 can be easily solved with the help of the QuickBooks Diagnostic tool. Now, to perform this solution, here are the steps.
- First, download and install the QuickBooks Diagnostic tool on the hosting PC.
- Now, scan the folder where the QuickBooks company’s files are located.
- Now, note down your IP Address.
- In the next step, as instructed by the diagnostic tool, configured the firewall ports.
- At last, open the QuickBooks company file to check for the error is resolved or not.
5. How Can I solve the error H505?
A: Error H202 and error H505 are two similar errors. Both errors occurred when the users try to open the company’s file which is located in another system. The methods and the solutions which we have mentioned to solve the Error H202 can be used exactly the same to solve the error H505.