Bank reconciliation is a process of matching the balances in accounting records, so that the difference between the ending balance and cleared balance will be zero. You must reconcile the banks at regular intervals for all your bank accounts so that the company’s cash records display the correct amount.
If you use the QuickBooks accounting software to manage your business activities, we suggest you reconcile the bank accounts once in 10-15 days. It will help you to match all the cash flow entries on your bank account with the entries in QuickBooks online.
If you are a new user of QuickBooks online and do not know how to reconcile in QuickBooks online, then you must read this blog post until the end. This content will provide you with a complete guide to the reconciliation process.
Why Should You Reconcile in QuickBooks Online?
Here is the list of compelling reasons why you should reconcile in QuickBooks online on a regular interval basis.
- Bank reconciliation is the easiest way to prevent online fraud, catching and rectifying errors on or before time.
- Fix common accounting mistakes, such as forgotten, wrong, or transposed numbers.
- Reconcile statements helps you identify the subscriptions you canceled, but the fees have been debited from your account.
- Ensures the verify the accuracy and validity of the financial data and information.
How to Reconcile in QuickBooks Online?
Let’s discuss the procedure you can follow to reconcile the bank statements in the QuickBooks online account.
Step 1. Open the QuickBooks Reconcile Page
- Firstly, log in to your QuickBooks online accounts.
- Thereon, click on the “Menu” option on the left side of the page.
- Under the settings page, click on the “Accounting” option.
- After that, click on the “Reconcile” option, and then you will be redirected to the QuickBooks reconcile page.
Step 2. Choose the Reconcile Bank Accounting
On the QuickBooks reconcile page, you will be asked to provide the reconcile details, which are as follows.
- Account: Click on the bank account option and choose the bank account which you want to reconcile in QuickBooks.
- Ending Bank Balance: Provide the ending bank balance of your account from the bank statement.
- Ending Date: Provide the ending date of the statement time period.
- Service Charged Information: Provide the data, service charge amount, and an expense account that has not yet been charged.
- Interest Credited Information: Add the amount you earned as interest in your bank account.
Once you are done providing all the details for the bank reconciliation, then click on the “Start Reconciling” option.
Step 3. Start Matching and Clearing Transactions
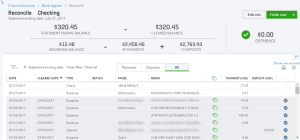
The QuickBooks reconciliation page provides details of the cleared transactions at the top and a detailed list of the transactions at the bottom of the page.
A. Summary of Cleared Transactions:
- Based on the previous steps, the ending balance and beginning balance will be filled automatically.
- The cleared balance is the difference between cleared payments and the beginning balance and adding cleared deposits.
- The difference between the ending balance and clearing balance will be shown on the right side of the summary.
B. List of Transactions:
- It includes those transactions of QuickBooks accounts that have not been cleared yet by the bank to this statement period.
C. Radial Buttons:
- Click on the radial button available on the right side of the transaction that the bank has cleared during this period’s statement.
Step 4. Confirm that Bank Reconciliation has Zero difference
To complete the reconciliation process, you must verify that the difference is zero.
- If the difference is zero, click on the “Finish Now” option available at the top right side of the screen.
- If the difference is not zero, try to locate and search for the transactions not recorded in QuickBooks.
Also Read – How to Change Beginning Balance in QuickBooks?
Step 5. Check and Save the QuickBooks Bank Reconciliation Reports
- After you click on the “Finish Now” option, QuickBooks will display a confirmation message and a link to view the reconciliation report.
- To access or view the report, click on the “View Reconciliation Report” option.
- This report will be shown at the top of the reconciliation screen.
- The other important report information, such as a list of uncleared, cleared, outstanding, or deposits, will be shown at the bottom of the screen.
Following the steps mentioned above, you have successfully reconciled the bank statements in your QuickBooks online account.
Recap
We recommend you make it a good practice to regularly reconcile the bank statements in QuickBooks online. In this blog post, we have provided you with five steps you can follow to reconcile in QuickBooks.
If you have any issues with the QuickBooks reconciliation process, then you can reach out to us through the chat box. You can also get in touch with our team by mail at info@rapidresolved.com. Our experienced and professional QuickBooks experts are available 24 hours a day to resolve your query.