An instance quite uncommon, people usually do not switch to a new name for their company every now and then. A business’s entire brand value depends on that, and it is not something that anyone can sacrifice overnight.
However, there are a few circumstances under which one would have to take a decision like such. If you are about to do something similar, you would also need to make these changes to all your documents, accounts, and QuickBooks database. This can be a bit tricky.
If you are a QuickBooks user, then you must be aware of all the features and functions that it has to offer. All these together make it easy for people to manage their accounts on a personal as well as professional level.
To help you figure that out, we have come up with this blog. Go ahead and find out why you need to make this edit. In addition to that, learn what steps you need to follow to make it possible.
Why Change Company Name in QuickBooks?
There is no one reason why someone would want to change their company name in the QuickBooks data. A spelling error, switching to a new one, and the list can go on. Here is why it is important that you have the right name for all your information:
Spelling Mistake
The first and foremost reason is a mistake in typing. This is very common, and anyone can do it. However, once you save the wrong one, you will have to go through the procedure of making the alterations.
Change in Company’s Name
Another reason is that you actually change the name of your company. You need to make the edits in your QuickBooks Desktop because your client recognizes your brand with the same.
To Access the Old Data
Now, you also need this alteration if you have done it once before and now need the information of the previous company name. Simply replace the new name with the older one, and you will have the details you need.
Also Read – How to Delete Transactions in QuickBooks Online?
How to Change Company Name in QuickBooks Desktop?
Now that you know if you need to go ahead with the process, here is how you can actually do it without any help.
Method 1: Using Company Menu in QuickBooks Desktop
In order to correct or switch your name in QuickBooks Desktop, you have two options. One of which is using the Company menu in the application.
• First of all, you need to run the QuickBooks Desktop application on your PC.
• Once you end up on its homepage, go to the Menu Bar and look for Company.
• A list of options will scroll down when you click on that.
• Thereafter, locate the Edit option and hit that.
• Eventually, this will take you to the Company Information window. This is where you can do the necessary. Replace the old name with the correct name.
• Remember, to alter the legal name of the company; you can head to the Legal Information option.
• Finally, hit OK to save all the edits you make.
Method 2: Through the Product Information window in QuickBooks
The second option to go ahead with the process is from the Product Information tab in the application:
• To initiate the process, go to the QuickBooks Desktop homepage.
• Once you are there, either hit the F2 key on your keyboard or go ahead with Ctrl+1.
• With this command, you will be able to access the Product Information page.
• Thereafter, you can locate the File Information from here.
• Once you have access to the File Information, right-click on the folder.
• Furthermore, look for the Rename tab, and you will be able to make the changes according to your requirement.
• Lastly, hit the Enter key, and save all the edits.
Method 3: Make the Edits in QuickBooks Self-Employed
Again, you have two methods to do the process:
By Logging In
• Firstly, go to Intuit’s login page.
• Once there, put in your QuickBooks ID and password and tick mark the “I’m not a robot” option.
• After that, click on the Login button and head to the homepage of your account.
• Furthermore, locate and click on the Personal Info section.
• This is where you can enter the new name of your company.
Canceling the Subscription on QuickBooks Online
• Again, you need to log into your account through Intuit’s website.
• Thereafter, look for the Gear icon that represents Settings. You will find this in the top corner of the page.
• Click on that, and then from the options before you, select the Accounts and Settings tab.
• There, you will locate the Company Name. This is where you can edit it.
• After that, head to the Billing and Subscription option and cancel the subscription from here.
• Furthermore, go ahead with the instructions on the screen and finally hit Done to finish the process.
Remove QuickBooks Company Name
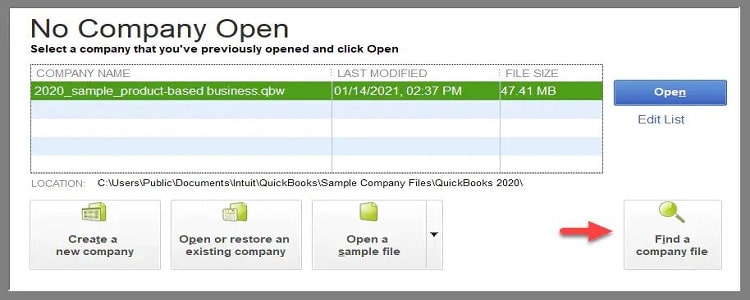
Let’s now see how you can delete your company name from your QuickBooks Desktop application:
• Firstly, run QuickBooks Desktop application on your system.
• Here, look for the No Company Open window.
• Thereafter, select Edit List from the available options.
• Eventually, you will get the list of all your companies.
• Select the one that you want to delete from your PC. You can use the Hide option in order to do so.
• In the end, hit OK to save the changes you make.
Wrapping Up
In order to rename your company file, millions of users come to the Internet in search of the solution. If you have also ended up here while looking for it, we hope this blog was helpful. We have here jotted down several ways for different types of users.
However, if you need any more information, get in touch with our experts. Our QuickBooks Enterprise Support team has decades of experience, and therefore they can help in the best possible way. We are available over a call, via live chat, as well as through emails. Send in your query, and we will reach out to you shortly.