While using QuickBooks, there could be inaccuracies entering transactions into the accounting system. When this happens, you would need to make requisite changes to the original transaction after it has been recorded.
This can be done easily by making journal entry in QuickBooks into the accounting software. Journal entries could be thought of as the last resort for entering transactions.
You might need advice of an accountant for making journal entries. However, if you have enough knowledge of accounting, you can also do it yourself.
To edit or correct transactions and publish items that cannot be handled in another way, such as adjustments to profit or loss, you can create journal entries in QuickBooks.
Although making a journal entry is quite simple, you can only do so for one client or vendor at once. You will need to post separate entries if you want to use this method to adjust numerous customer or vendor balances.
What exactly is a journal entry in QuickBooks?
An accounting transaction that is directly submitted to the general ledger is known as a general journal entry.
The principal group of accounts used by a corporation to record transactions for the balance sheet and income statement is called the general ledger.
For instance, you might have accidentally entered your company’s $100 monthly electricity bill into the insurance expense account.
You can fix your error by posting an adjusting QuickBooks journal entry to increase, or debit, the utility expense account by $100 and decrease, or credit, the insurance expense account by $100.
Then, all of your accounts would be in order, and since the amount owed by your vendor was accurately recorded, you wouldn’t need to adjust it.
Entries for Year-End Activities in the Journal
In order to perform year-end tasks like submitting tax changes to your books, documenting depreciation expense, or reclassifying revenues and expenses, your certified public accountant or bookkeeper may need to write journal entries.
If you prefer to submit the journal entries yourself at year’s end, your accounting professional can give you detailed instructions along with justifications for why the entries were required for your specific circumstance.
How Do I Create a General QuickBooks journal entry?
By using QuickBooks, you can create general journal entries by following these detailed instructions:
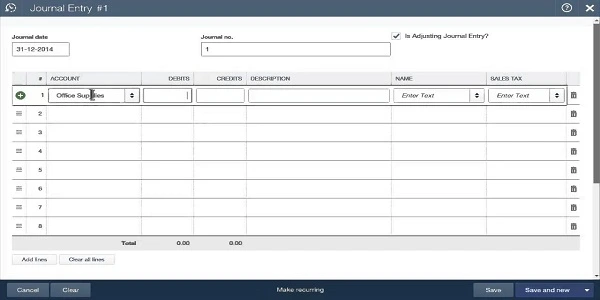
1. From the menu in the upper-right corner of the screen, select Company > Make General Journal Entries.
2. In the Make General Journal Entries window, adjust the Date field as necessary. If you want to publish an entry for a previous month or year, make sure to modify the default date in QuickBooks so that your entry is recorded in the appropriate financial time period. QuickBooks will default to the current date.
3. In the Account column, type the general ledger account number. In the Account column, there is a drop-down menu where you can choose the initial account.
4. Fill out the Debit or Credit columns with the appropriate amount for the account you’ve chosen. To balance the entry and enable QuickBooks to post it, the debits and credits must be equal.
5. Fill up the Memo Column with a detailed memo. On reports that contain this journal entry, it will be shown.
6.Although this step is optional, it is advised so that you will remember why the entry was made in the future.
7. Continue performing Steps 4 through 6 up until all entries have completely cancelled each other out and the transaction has a balance of zero. The journal entry will be appropriately balanced when the sum in the Debit column equals the sum in the Credit column.
8. Choose Save & New to save the journal entry and open a new window, or choose Save & Dismiss to save it and close the current window. Using these procedures, you may create the majority of general journal entries in QuickBooks; however, if you want to create journal entries that have an impact on a specific customer’s or vendor’s accounts payable or receivable, you must list the customer or vendor on the first line of the entry.
Change a QuickBooks journal entry
Here’s what to do if you need to alter a journal entry:
1. Firstly, access the Company menu and then choose the Make General Journal Entries option.
2. Secondly, find and choose the journal entry that you need to edit;
a.) In QuickBooks for Windows, you need to select, find and enter credentials such as Name, Date, Entry number, amount and then choose Find.
b.) Similarly, in QuickBooks for Mac, you need to find and select the journal entry from the list on the left side of the Make General Journal Entries window.
3. Subsequently, choose the journal entry in Mac or double-click it in Windows and make your updates. After you are done, you need to chose Save or Save & Close.
4. In order to record the changes, choose the Yes option.
Reverse a QuickBooks journal entry
To reverse the QuickBooks journal entry, you would need to follow the below-mentioned steps;
1.) Firstly, access the Company menu and then choose Make General Journal Entries.
2.) Thereafter, find and choose the QuickBooks journal entry that you want to choose;
a.) In QuickBooks for Windows, you would need to choose, find and enter the credentials such as Name, Data, Entry, Enter number, amount, etc and then select Find.
b.) In QuickBooks for Mac, you would need to find and choose the journal entry that you want to reverse on the left side of the Make General Journal Entries window.
3.) Thereafter, you need to choose Reverse.
4.) Lastly, you need to choose Save or save & close.
The reversed QuickBooks journal entry would have an “R” next to the entry number and debit and credit amounts reversed. Following the original transaction date, the new entry would be dated the first day of the next month.
Delete a journal entry
To delete a journal entry, access the Company menu and choose Make General Journal Entries.
Find and choose the journal entry that you want to delete:
1.) For QuickBooks for Windows: You need to Choose, Find and enter the credentials such as Name, Date, Entry No., or Amount. Thereafter, select Find.
2.) In QuickBooks for Mac: Here, you would need to find and choose the journal entry that you want to reverse on the left side of the Make General Journal Entries window.
To delete the journal entry:
1.) In QuickBooks for Windows: Here, you would need to double-click on the journal entry and then choose Delete or Void and then OK.
2.) In QuickBooks for Mac: Here, From the Edit menu you would need to choose Delete General Journal.
Lastly, you would need to Select Save & Close.
Conclusion
In this write-up, we have tried to help you with the process of making, reversing and deleting journal entries in QuickBooks. We have also explained the essence of journal entries in QuickBooks.
Using these solutions, you can very easily make, delete or reverse journal entries in QuickBooks Desktop. However, if the situation arises where you are not able to navigate through this, you would want to seek professional help.
We are a bunch of professionals who are adept at solving such issues. Feel free to get in touch with us either through email at [info@rapidresolved.com]. We look forward to resolving your issues.